Hello Fandroid, this is a step by step tutorial to show Rooting and Unrooting of Samsung Galaxy Note 4 all variant. This tutorial show you a safe method to root and unroot your Note 4 all variants without a data loss and without harming your device unless you will do something wrong during following my instructions. Dont use rooting to pirate applications and games, only use it for productive work. However rooting helps you to overclock CPU speed as well as many other things. But to keep it simple stay with the basics.
PLEASE NOTE: THIS METHOD WILL TRIP KNOX AND DISABLE YOUR PHONE WARRANTY, BUT ITS SAFE.
To Root your Note 4 using this tutorial you need two things :
1. Samsung Kies: http://www.samsung.com/uk/support/usefulsoftware/KIES/JSP
Download a Samsung Kies from a Samsung Official Website directly to make sure you have correct drivers installed in your computer for your Note 4.
2. Download Odin Software and extract it using winrar : http://www.putlocker.com/file/D3C9FD57F547AFFD
After downloading Odin 3 download Root software for installing root on your Note 4 All variants from a below links. Please make sure your are downloading a correct rooting tool kit for your Note 4 from a below link .
SM-N910F (International, Qualcomm): CF-Auto-Root-trlte-trltexx-smn910f.zip
SM-N910G (Asia, Qualcomm): CF-Auto-Root-trlte-trltedt-smn910g.zip
SM-N910H (Asia, Exynos): CF-Auto-Root-tre3g-tre3gxx-smn910h.zip
SM-N910T (T-Mobile USA, Qualcomm): CF-Auto-Root-trltetmo-trltetmo-smn910t.zip
SM-N910P (Sprint, Qualcomm): CF-Auto-Root-trltespr-trltespr-smn910p.zip
SM-N910R4 (US Cellular, Qualcomm): CF-Auto-Root-trlteusc-trlteusc-smn910r4.zip
SM-N910W8 (Canadia, Qualcomm): CF-Auto-Root-trltecan-trltecan-smn910w8.zip
SM-N910C (Thailand, Exynos): CF-Auto-Root-trelte-treltexx-smn910c.zip
SM-N910U (Hong Kong, Exynos): CF-Auto-Root-trhplte-trhpltexx-smn910u.zip
SM-N910K (Korea, Exynos): CF-Auto-Root-treltektt-treltektt-smn910k.zip
SM-N910L (Korea, Exynos): CF-Auto-Root-treltelgt-treltelgt-smn910l.zip
SM-N910S (Korea, Exynos): CF-Auto-Root-trelteskt-trelteskt-smn910s.zip
SM-N9100 (China, Qualcomm): CF-Auto-Root-trltechn-trlteduoszc-smn9100.zip
SM-N9106W (China, Qualcomm): CF-Auto-Root-trltechn-trlteduoszn-smn9106w.zip
SM-N9108V (China, Qualcomm): CF-Auto-Root-trltechn-trltezm-smn9108v.zip
SM-N9109W (China, Qualcomm): CF-Auto-Root-trltechn-trlteduosctc-smn9109w.zip
If you have not found CF Auto Root file for you Note 4 Variant then you can directly go to CF Auto Root Site and search for your Model CF Auto Root Files from a below link
CF AUTO ROOT SITE: http://autoroot.chainfire.eu/
After downloading CF-Auto-Root for your Note 4, extract it using winrar and you will get 3 files like a below picture, but you have to ignore two odin files because we have already installed odin in our system. However if you have not installed odin then install odin in your PC.
STEP 1:
Now once you have installed a Samsung Kies and open it with your Note 3 connected with your computer, it will automatically detect your phone and install all the necessary hardware of your phone in your computer. When you connect your phone with your pc it will look like a below picture in Samsung Kies.
After doing this step, make sure you have closed down a Samsung Kies as well as you have disconnected your phone from computer.
STEP 2:
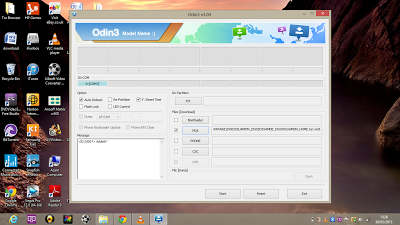
After installing drivers through Samsung Kies you have to open Odin. Now from a ODIN Folder you have to press a third file which is Odin3 (Run as Administrator and make sure your phone is disconnected from computer). After opening it you will see a window like below picture.
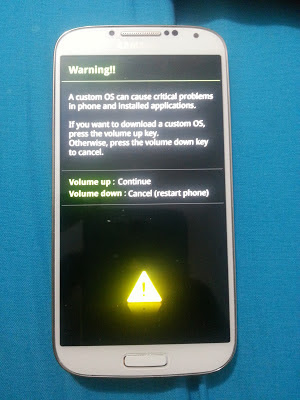
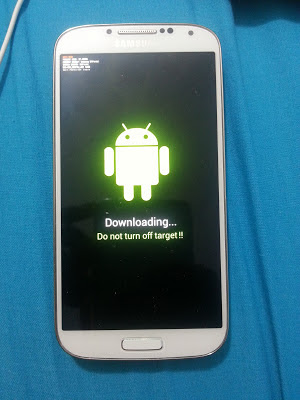
After opening this Odin file you have to turn off your Note 3 by pressing power on and off key on your Note 3 until its get completely off. Once it gets completely off PRESS (POWER ON AND OFF KEY + HOME BUTTON + VOLUME DOWN KEY AT THE SAME TIME). This will get you in to a downloading mode like a below picture in your phone.
After getting in to a downloading mode you have to press a UP VOLUME KEY ON YOUR PHONE and you will see a window like below picture on your phone
Now when you see a above window connect your Note 4 with your pc through micro usb lead and you will see a below picture like window on your PC
Here you can witness that Odin (Id-com) section has become blue in above picture. Now you have to press PDA in Odin and you have to search for a file CF-Auto-Root-trlte-trltedt-smn910g.tar (if you are on different variant than you will have something else instead of smn910f) which is in your downloaded CF-Auto folder. Look at below picture to see how this file looks like
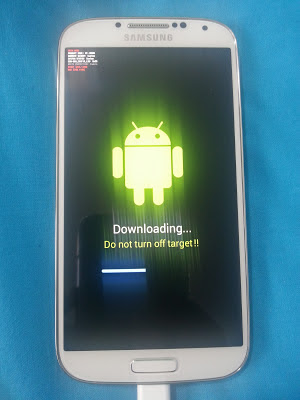
Now double tap on the file it will be added to Odin and press Start in Odin and leave your phone as it is. After starting a process you will see a window like below picture in your phone with downloading bar and then let process to go complete until your phone get restarted (make sure you dont touch your phone unless its restarted
In your PC you will see a picture like below in Odin
Green Box will be highlighted in Odin just above the blue box which illustrates that you have did all the things correct. After your phone restarted you will see Super User in your mobile which means you have successfully rooted your phone :), like below picture
Now you can transfer games to you External Sd card easily and as well as you can play them. If you dont know how to transfer games after rooting check out this Youtube Video made by me:
HOW TO UNROOT
Its very easy to Unroot Note 4 after rooting it. Make sure you have installed proper drivers by installing Kies on your PC. If you have followed my steps to root your device, you must have all the drivers installed by now. If you have not did rooting by looking at the above tutorial, then just have a quick go at Rooting process (Step 1). To unroot your Note 4 you need three things which are going to take little bit longer than rooting your phone.
1. Download a firmware for Note 3 from sam mobile site:
http://www.sammobile.com/firmwares/database/SM-N910G/XSP/
When you press the above link you will see a window like a below picture to download a Note 4 firmware.
This site needs registration, but registration is free and after that you can download a firmware. This file is going to take a little bit more time to download because file size is around 1.8 giga bytes.
After downloading a file you have to extract it using a winrar and after extracting it you will find two files inside a folder like below picture
No here again you have to open Odin to unroot your device
Now shut down your device and after shutting down your mobile Press Power On Key + Home Button + Down Volume key at the same time and you will see a window like like below picture on your phone

Now here you have to press Up Volume Key to continue and you will be entered in a window like below picture
Now connect your phone with PC and open Odin in your PC (Run as Administrator) and Odin first box will go sky blue like a below picture, if you have successfully installed all the drivers. Make sure you have closed Samsung Kies in your PC.
Now press PDA to find out your downloaded Note 3 Firmware which you have downloaded from Sam mobile (make sure you have extracted the file using winrar). Your firmware should be look like a below picture on your PC. Make sure only two things are ticked in Odin: Auto Reboot and F. Reset Time like a below picture when you add a firmware to ODIN.
Now press start and if Odin gives you a message dont responding like a below picture now worries because its going to respond after taking its time
Now when its start responding you will see a below like picture on your Pc and Phone, dont touch anything now
After all the downloading process get complete you will see a picture like below in your PC and your phone will be restarted automatically.
Now you have to make a backup of your files using Samsung Kies, so you will not loose your internal storage files, if you have saved all the things in your external sd card no worries. After making a backup, power off your phone and Press Power Key + Up Volume Key + Home Button at the same time and you will see a below like picture on your phone.
Now here from down volume key go to wipe data/ factory reset and press power button. Now you will see a below like picture
Now use down volume key again and select Yes--delete user data by pressing power button
and below picture like window comes up and here you have to press reboot system now by pressing power key. Now reboot will take little bit longer because we are installing a firmware. Thats it you have successfully unrooted your device, claim your warranty or else sell your phone if you want to :).
Easy method to improve the camera performance of note 4 all variants tutorial link:

.png)
.png)
.png)
.png)

.png)
.png)

.png)

.png)
.png)
.png)

.png)
.png)
.png)

.png)


Posting Komentar